Page 1 of 2
My first origami dragon diagram
Posted: March 7th, 2009, 2:01 pm
by SilverRazor
I think I killed about 2 hours or something on it, even though there are less then 20 steps and it is very simple >_<
Anyway here is a
link to my blog post, where I describe the details. I would like to get some feedback on this one, and I will appreciate any advice!
I target mainly a newbie audience, of my level and lower. Do you think I supplied enough detailed instructions for a complete newbie to understand?
Thanks in advance!

Posted: March 9th, 2009, 11:31 am
by Ondrej.Cibulka
I think it is quite OK. Just forming of the head is not correct, please check it. But using for the newbies in the origami, so it need to proove it on some newbies. I will try my wife.

EDIT: I am looking on this model for the whole day and I can see its high aesthetics.
Posted: March 9th, 2009, 7:56 pm
by SilverRazor
Thank you so much for your reply

I didn't know what to think when I saw ~100 views of the thread an 0 responses >_<
I found an easy way in Inkscape to make arrows btw, so I'm thinking about refining the diagram a bit. Maybe I'll try to form it in Inkscape itself, not sure about coloring stuff though, it's much easier to do in Photoshop.
I'm not sure about the head, what's the problem?
I like this simple dragon as well, don't know who designed him though.
Btw. Whole day?
Posted: March 9th, 2009, 11:31 pm
by M Deutsch
Its alright! I think you shouldn't have sacrificed clarity for the very small space you shoved the diagrams into.
Also often instead of arrows between the steps, which generally signify an enlarged view, many diagrams place a slightly darker colored ribbon running behind the diagrams.
Like This:

Posted: March 10th, 2009, 12:23 am
by Ondrej.Cibulka
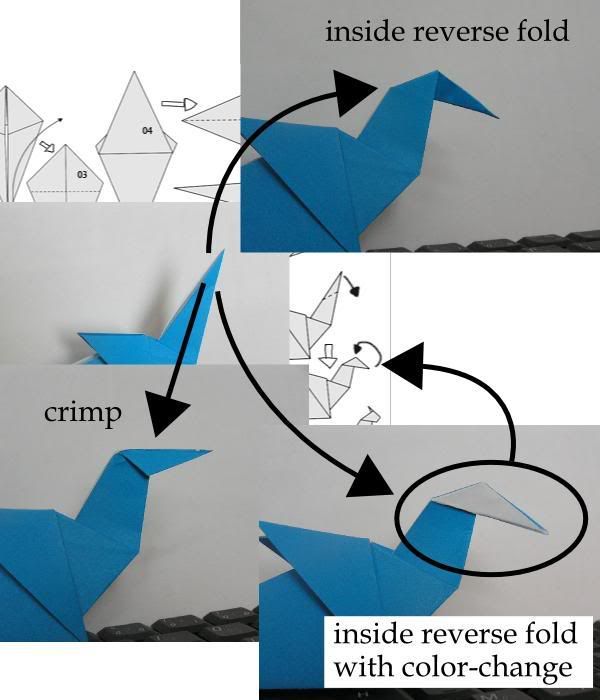
About the head: I prefere simple way to interpret object, it is OK. I think, it is not draw correctly. If you make inside reverse fold, it will look in different way than in diagram - I need to make color change that inside reverse fold to obtain scheme on the diagram.
Posted: March 10th, 2009, 8:33 am
by SilverRazor
Hey, it does look so much better with the ribbon instead of arrows! Thanks!
About the head. You see, it's just after folding around 5 variations I've found out that tiny changes to the shape of the head makes big difference. I used photos I taken as references for drawing the diagram, but the photos I had were taken from only one variation, and it hadn't the best looking head. That's why I tweaked it just a little. Maybe I overdid it, but honestly, I can't see what's really wrong. I'll try redoing it, maybe it will be ok the second time.
Just to make things clear - do you refer to the head or to the neck? O.o
Posted: March 10th, 2009, 1:02 pm
by Ondrej.Cibulka
I mean the head, not the neck, see the picture. I made quick photos to ilustrate what I mean. Inside reverse fold (which is expected due to arrow and line) do not lead to the next picture, also crimp do not work. Actually, it is quite confusing.
Posted: March 10th, 2009, 7:18 pm
by origamimasterjared
The diagrams look like they just show a valley fold followed by a mountain fold. Not the best idea, as it's not stable.
Posted: March 10th, 2009, 7:50 pm
by SilverRazor
Ouch! I missed that detail completely

I finally noticed what the problem is! Thank you very much for clarifying this one! Gonna fix this soon.
Jared, what do you mean? I don't quite get it 8(
Posted: March 10th, 2009, 10:12 pm
by Ondrej.Cibulka
origamimasterjared wrote:The diagrams look like they just show a valley fold followed by a mountain fold. Not the best idea, as it's not stable.
The diagram is completely simple, so one must guess some steps. This version, what you suggest, works and lines and arrows indicate it, you are right. And from the metal-foil paper it should be stable. In some cases it should be better, but, I think, not in this one. Whole model is two sided, why do the head one side?
SilverRazor wrote:I missed that detail completely
I understand that you missed it. I have been drawing diagrams for some time and I am hairsplitter (pedant) so I love details.

Posted: March 10th, 2009, 10:33 pm
by origamimasterjared
I agree, Ondrej. I also have drawn, tested, analyzed, and edited many diagrams. I didn't understand why the head would be one-sided, but that is what the diagrams showed, and I wanted to point that out to SilverRazor. Also, Ondrej, that's not a color-changed inside reverse fold. It's an outside reverse fold. Color-changed or asymmetric outside reverse fold.
Hey SilverRazor, now that you're warmed up, how about some diagrams for that guy in your picture? That's a pretty sweet-looking serpent.
Posted: March 10th, 2009, 10:38 pm
by ftangdude55
Or "hybrid reverse fold". Either way, it's a colour change.
Posted: March 10th, 2009, 11:01 pm
by origami_8
No, it's like Ondrej said an inside reverse fold that will be colour changed afterwards.
The overall impression of the diagrams is nice, yet it would be better to stick to the usual drawing system with --- for valley folds, -..- or -.- for mountain folds and reverse folds (see steps 9+17). In steps 13+14 a fold line is missing. Steps 10+15 should contain fold lines as well, maybe in a light grey to indicate that they are made on hidden layers. It's written in the text, non the less I would insert a quarter turn symbol between steps 4 to 5 (who reads the text when there are diagrams?). Step 7 needs a repeat behind arrow. Maybe the begin would be less confusing if you would show the fishbase then turn the model over and make the valley fold.
Very good work on your first diagrams

Posted: March 11th, 2009, 7:03 pm
by SilverRazor
Hey everyone, thanks for the feedback!
I've worked on the diagram a bit, and tried to fix all of the issues you have addressed. Before I post it on my origami dragon blog, I would like to hear your opinions about the updated version.
It's not finished - I haven't added the step counters, and I'm thinking about adding some short text instructions.
I have reduced the steps snapshots from ~20 to 13, therefore I suddenly had a lot more space, so after step 5 I scaled everything by 200%. I thought about scaling it even more by erasing the long tail for a couple of steps that does not focus on it, but I don't think it's necessary to be honest.
This time I have re-arranged the snapshots in Inkscape on the proper sized document, instead of exporting every single layer to Photoshop. Inkscape crashed after I finished with the 4 first steps, and I had to redo them. Seems like Inkscape is just like the 3ds max and some RPG games, where you have to save after each sneeze
Also, the arrows are all made in Inkscape with the end markers feature, except the one from step 5 to step 6, which is supposed to mark magnifying.
I tried to stick to the standards this time, with - - - for the valley folds and -.-.- for the mountain folds. Hidden ones I marked with . . . hope it's ok and clear.
The larch.
...
...
I mean, the diagram

Posted: March 11th, 2009, 7:16 pm
by origami_8
Very good, you improved a lot.