
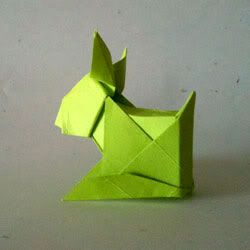
may be someone wants to try it: http://www.youtube.com/watch?v=6mICpDx0aug
if you do so, please leave a comment on what to improve for a better understanding. there's cp at my flickr gallery - just for the case that the video's too hard to follow ...
rabbit video instruction by grizzlyman
Forum rules
READ: The Origami Forum Rules & Regulations
READ: The Origami Forum Rules & Regulations
rabbit video instruction by grizzlyman
if you're going to visit my little flickr_gallery, please leave a comment - a critical one is welcome, too, if necessary: http://www.flickr.com/photos/57625237@N02/

-
joshuaorigami

- Buddha
- Posts: 2344
- Joined: April 26th, 2010, 6:35 pm
Kewl! I might try it...
my diagrams page http://snkhan.co.uk/forum/viewtopic.php?t=7177
my flickr gallery http://www.flickr.com/photos/52731923@N04/
my flickr gallery http://www.flickr.com/photos/52731923@N04/
-
jadylyon
- Junior Member
- Posts: 114
- Joined: January 18th, 2010, 6:07 am
- Location: British Columbia, Canada
hi grizzly!
i took courage in both hands and learned how to fold your rabbit. i didn't do a particularly great job of it, mind, but it does in fact resemble a rabbit - it has ears and everything ;)
however, as a "not incredibly experienced" folder, I had difficulty at parts following the video instructions. In no particular order, these are the problems I had:
The video was unclear/unsharp, so the notations you were making near the beginning with the pen/pencil were useless as they could not be read. In fact, the original series of marks you actually held up out of camera range so the blurry problem was sort of moot.
Your video was sideways to my point of view - in other words, you were folding "straight" but I was seeing it from a different angle which made it difficult to figure out the fold sequence. I had to rotate my paper after nearly every fold to match what I was seeing on the screen. It would have been much better if you'd filmed from "over your shoulder" somehow so what you were doing would match what I was doing.
Because of the side-view, it was surprisingly hard to figure out which way to flip the paper, going from back to front. It didn't help that sometimes you flipped the paper off-camera so I was no longer sure which edge was facing where.
A few times you did fold sequences also out of camera range. That was unhelpful!
I simply couldn't figure out at all what reference point you were aligning to in the step where you make the / folds just before you turn and make the rabbit head on the neck. It didn't SEEM like you were following the line of existing paper overlap but I couldn't figure out what else you might have been aligning to. My head ended up in a slightly different position that yours (farther back) on the neck.
Not really a comment on the video, but apparently I really have a terrible time with pleat/crimp folds. The nose turned out not too bad but I couldn't figure out how to push in the ears properly. I am sad. They are somewhat mangled (but they still look like ears!).
... This concludes my commentary. I will practice more :)
---------------------------
PS. do we get a video of the little cocky devil-man?! i would bribe you, if it would help. I will have worse trouble but you have no idea how hard I'd try to get it right.
thanks a lot, jadylion, for your try and - of course - the long comment on my video! i feel really sorry for the problems you've got with the lack of quality.
the video came out of a mood to do a fast instruction. someone asked for an instruction to create small new year's gifts with. i'm far away from being good and fast in drawing diagrams but i wanted to help. so i just took my camera, a tripod and some paper ...
the result you've seen at youtube is already an update of the first version but i know it's still difficult to follow. with enough time to get ready i'll see if i'll manage to draw a step by step instruction before easter and you're welcome to become a testfolder, if you'd like to.
if you won't wait that long but fold the rabbit again i could try to give some hints on the most complicated steps:
it may be helpful to print the cp as a basis ... the reference points i've tried to mark with my pencil are imortant to prefold the edges of the rabbit's back. if there isn't already a crease you'll need a mark at the quarter points along the tail-nose-line. with folding the tail-edge to the headquarter and the nose-edge to the tailquarter you'll catch two further marks (at 3/8 from the outer edges). now fold the tail-edge to these 3/8-marks to create the necessary backshape-creases horinzontally (ending at the vertical lines that devide the left and right quarters).
for vertical precreases you need marks at the outer 1/8 where to fold the side-edges to for getting vertical precreases (ending at vertical lines).
i wonder if this will really clearify something or if it causes even more confusion ...
i fear the devil would take far too much time to make a video from but may be i'll draw instructions for him, too. but you'll have to stay patient ...
if you're going to visit my little flickr_gallery, please leave a comment - a critical one is welcome, too, if necessary: http://www.flickr.com/photos/57625237@N02/
-
jadylyon
- Junior Member
- Posts: 114
- Joined: January 18th, 2010, 6:07 am
- Location: British Columbia, Canada
i would never want to UNencourage someone to make videos of their work - particularly you since I adore your figures. But straight up, if you could figure a way to film .. uh, straight down so that the orientation was the same for the folder following along, that would be of most benefit. And I did, in fact, make a rabbit. In fact, now I've made TWO rabbits!
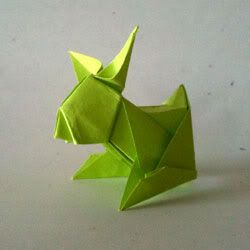
The second one certainly came out better and I can only improve by using some more flexible paper - but I wanted to show you what I accomplished on the second try. Are you crimping the nose twice? Is the back supposed to be perfectly flat at the end? Oh! And I figured out the / angle for the head this time around - you're bisecting that angle which put the head in the right position.
I messed around on my first attempt, trying to see if I could get the tail to puff and trying different feet for paws. Now the paper is truly mangled, which is the mark of excellence *cough*.
I enjoyed folding this, very much. I know the devil has to be more complex but anything you feel like videoing or diagramming, I shall throw myself into the fray to complete. No, really. :)
-
The Average Folder

- Super Member
- Posts: 241
- Joined: November 15th, 2010, 3:18 pm
- Location: New York, USA
- Contact:
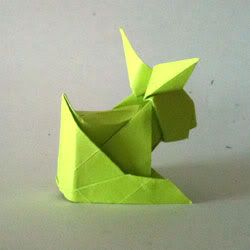
Cool! I would suggest making the rabbits head 3-D (Of course, assuming this is your design) by bisecting a small potion of the head flap with a valley fold and folding it around the back. Just a suggestion because from the picture it looks like the theme is 3-D so one more to add to the pile! 
Folding is everything, and everything is folding
My Flickr- http://www.flickr.com/photos/58368473@N06/
-Mike
My Flickr- http://www.flickr.com/photos/58368473@N06/
-Mike
well done, jadylion! thank you for posting a picture.
i use to shape the snout in a different way - it's probably visible at the red-rabbit-picture at the challenge thread or at my flickr gallery.
shorten the nose line somewhat by folding a small (upper) part in. to imitate whiskers i fold a little triangle back to the left and the right side.
i prefer a flat back and also the tail just as flat as it is to be seen at my picture posts but please feel free to go another way of shaping - may be a rabbit ear ...
if you're going to visit my little flickr_gallery, please leave a comment - a critical one is welcome, too, if necessary: http://www.flickr.com/photos/57625237@N02/
-
The Average Folder
- Super Member
- Posts: 241
- Joined: November 15th, 2010, 3:18 pm
- Location: New York, USA
- Contact:
Yes! Rabbit ear  That was the word I was looking for. It didn't occur to me at the moment
Folding is everything, and everything is folding
My Flickr- http://www.flickr.com/photos/58368473@N06/
-Mike
My Flickr- http://www.flickr.com/photos/58368473@N06/
-Mike