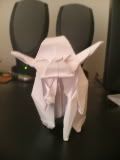
I'm still around, and I decided to gat help with another model I've been having trouble with: Fumaiki Kawahata's "Jedi Master Yoda"
What I don't get is step 24... I simply cannot get the same result And also, what does the spanish say in between steps 40 and 41?
PS: pictures would help
Last edited by Cupcake on July 28th, 2006, 7:46 pm, edited 1 time in total.
I suggest you first try folding this model, because when I first looked at the diagram, I thought the same thing... It's more complicated than it looks
I don't have access to a digital camera, unfortunately. Otherwise I would have put pictures in my first post. But I'll try to describe it:
In the picture of the model just before performing step 24, you can see two layers of paper (the green triangle and the grey background). In fact, there is the third layer of paper (the opposite corned of the original square) folded up in back. So you need to treat the second two layers as one and fold them together. Then you just have a reverse fold between the front green triangle and the back two layers together. On each side, reverse-fold in then out, noting that the two reverse-folds do not meet at the top.
Oh, also, it looks like the mountain and valley fold designations might be wrong in the diagram. I'm pretty sure these are suppose to be reverse folds in and out. So the mountain and valley folds are drawn correctly on the green triangle, but opposite what they should be in the grey area. Does that help?
umm... I figured out those two things on my own... Now, about step 40-41... what does that say? I need a lot of help with this step... I translated it, and it says something like "Carry out the remaning folds of the hand in the following figures"...
Last edited by Cupcake on July 28th, 2006, 8:21 pm, edited 1 time in total.
I think the numbers in the diagram step 41 correspond to the order in which you collapse the paper. Notice that the folds labeled "1" were formed in step 37-38, and the folds labeled "2" were step 39. Then "3" folds in the tip, "4" reverse-folds the middle of the flap. Then it looks like there should be three flaps. "5", "6", and "7" thin these by reverse-folds. Then "8", "9" and "10" thin them again.
I hope that helps.
EDIT: It translates better as "Form the rest of the folds to make the hand [i.e. Yoda's hand] as indicated in the following diagram."
I always fold the top layer of his stick in half for a colour change... it just dosent look right being the same colour as yoda himself, great model though and one of the many reasons that tanteidan 3 is the best they have ever released.
I thought about doing that (or, in my case, reverse folding the staff at a different layer for a color change), but I like it this way better. I think it's more important to have a contrast between the robe and the staff. The top bit should be green because it's Yoda's hand.
I also considered doing a color change and then applying something to darken that bit of the paper after, but I'm lazy.