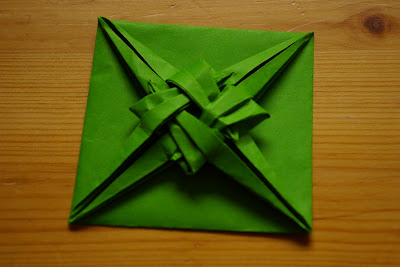
And, someone can post a link or ad explaination of the origami Braided Paper? (for who don't know, is this: http://dev.origami.com/diagram_load.cfm ... raided.pdf)
I can't go up to the 6 step, the instruction are a little bit confuse for me.. mmm...
Really thank you very much, and sorry for the english.. sure is full of errors..
I don't know the beautiful green model, but concerning your brainded paper i got some advice.
In step 5 you have to do the same creases as in the previous step, but with the opposite corner.
Step 6 is "just" sinking all the corners. If you don't know how to open sink corners just search the forums. I am sure you will find some instructions!
If i got some time i'll fold the brainded thing later, looks nice
Thank you max! Now i am in your 5th photo uploaded in picasa, but i don't understand the others photos. I don't understand the step 7-8, and for this reason, the step 9 appear to me impossible.. because where is the part of the paper that i must extend? The part that at the end must be jammed?? I really don't understand..
Are you so courteous to show me some others photos from this step to the end?? Now this is a challenge for me, i want to complete this origami!
Please help me..
And really thank you very much!!
Last edited by Kenji on May 25th, 2008, 4:09 pm, edited 1 time in total.
There are two layers, you have to reverse fold the inner layer on the angle bisector. Thats what is called x-ray view in the diagram.
I don't want to unfold the model and right now i am not motivated to fold a new one. Try it and take your time...if you will not be succesfull till tomorrow i'll fold another one and take some more photos!
OK! I finished the diagram!! This first attempt was a little bit unclear.. Now i redo the diagram and i think this time all is good. Then i post a photo of my completed origami!!
Thank you Max, without you i never do nothing over the step 6..
That first one is what is known as Fujimoto's Hydrangea. There used to be instructions at http://www.raviapte.com , but I think I remember reading that Ravi forgot to renew his website subscription.
I think i go wrong at the end, when i do the step 9, because the step 10 then is a little bit different from my result... and if i continue to place the 4 part down, like the step 10 to 13, my figure is a little bit plus precise, plus simmetric, but in the diagram the base of the star have a little side not in line, and do a big angle, near 170°.. in my figure is all straight...
I know that is hard to explain in words this thing.. you understand me?
No, I do the sinks in step 8.. but i go at sense, looking also your photos..
In practice i do the same thing that i do in the step 7, i do a reverse fold into the little fold that i've do in the step 7.. This take me a lot of time.. and finally my figure is really like your photo in picasa that show this step.. So, i think that this passage is correct, but probably the mistake is here..
Can you help me? I'm with this origami from this morning, i've not touched books of university today... This was a lost day for me.. i have at least to finish this origami....
Step 8 is not the same pleat as step 7!!
You do have to perform an open sink, no reverse fold.
I you dont know what an open sink is, search the net or the forums and practice it.
With that knowledge you should be able to solve your problem.