OK, so this is a very elementary question (and if it gets posted twice, my apologies... my first attempt seems to have disappeared).
Can anyone explain to me what is happening in step 7 of this diagram?
http://www.origami-instructions.com/origami-tato.html
So simple, but I am stumped. I'm sure I'm doing it right up that point with the rabbit ears, etc.
I just don't get how to "Pry open the paper slightly, crease the paper as indicated in the photo below." Even with the pictures. I don't know if it's the perspective of the photo or my obtuseness. Or links to a regular diagram might even help!
Help with step in folding a tato box
Forum rules
READ: The Origami Forum Rules & Regulations
READ: The Origami Forum Rules & Regulations
-
jadylyon
- Junior Member
- Posts: 114
- Joined: January 18th, 2010, 6:07 am
- Location: British Columbia, Canada
Re: Help with step in folding a tato box
Hi Fncll;
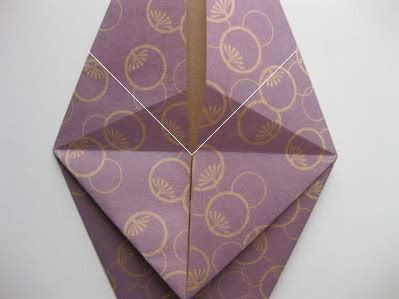
You're right, it is a pretty easy step. You just need to to bisect the two sides with a valley fold using the horizontal crease as your guide and flatten. Admittedly the picture doesn't make it incredibly clear. I drew the 45 degree angles on the picture which I hope helps visualise it.
You're right, it is a pretty easy step. You just need to to bisect the two sides with a valley fold using the horizontal crease as your guide and flatten. Admittedly the picture doesn't make it incredibly clear. I drew the 45 degree angles on the picture which I hope helps visualise it.
-
fncll
- Super Member
- Posts: 221
- Joined: September 26th, 2010, 7:50 am
- Location: Fairbanks, AK
- Contact:
Re: Help with step in folding a tato box
Perfect! Thank you, thank you. Your picture makes much more sense... the image made it look like I was folding to some corner that didn't exist...
-
jadylyon
- Junior Member
- Posts: 114
- Joined: January 18th, 2010, 6:07 am
- Location: British Columbia, Canada
Re: Help with step in folding a tato box
Yeah, the picture was very artsy :)